anaplan-connector-docs
Setup & User Guide
Anaplan Connector for Google Sheets™
Welcome to the Anaplan Connector!
This comprehensive guide will walk you through everything you need to know to set up and use the Anaplan Connector for Google Sheets. Whether you’re connecting to Anaplan for the first time or looking to master advanced features, this guide has you covered.
What You’ll Learn:
- Two authentication methods (OAuth/SSO and Basic Auth)
- Connecting to your Anaplan models and fetching data
- Setting up automated data refreshes
- Creating schedules and managing data updates
- Advanced features like formatting, cloning, and multi-model support
Time Required: 15-20 minutes for initial setup
Prerequisites: Google Sheets account + Anaplan account (organizational domain recommended for OAuth)
Table of Contents
- OAuth Setup Wizard (First-Time Setup)
- Authentication Setup
- Configuration - Multi-Model Setup
- Refresh Sheets - Batch Data Updates
- Scheduling - Automated Refreshes
- Quick Actions - Formatting & Cloning
- Dark Mode
- Multi-Model Support (Advanced)
- Troubleshooting & FAQs
- Technical Details
1. OAuth Setup Wizard (First-Time Setup)
Important: If you plan to use OAuth/SSO authentication, you must complete this one-time setup first. This configures the OAuth client in your Anaplan tenant and establishes the connection between Google Sheets and Anaplan.
When to complete this: Before your first OAuth login (one time per organization)
Who should do this: Anaplan administrator with OAuth client management permissions
1.1 Accessing the Setup Wizard
- Open your Google Sheet and navigate to Extensions > Anaplan Connector > Setup OAuth Client
- The OAuth Setup Wizard will open
- Select your role: IT Administrator (if you have OAuth credentials) or End User (if you need credentials from IT)
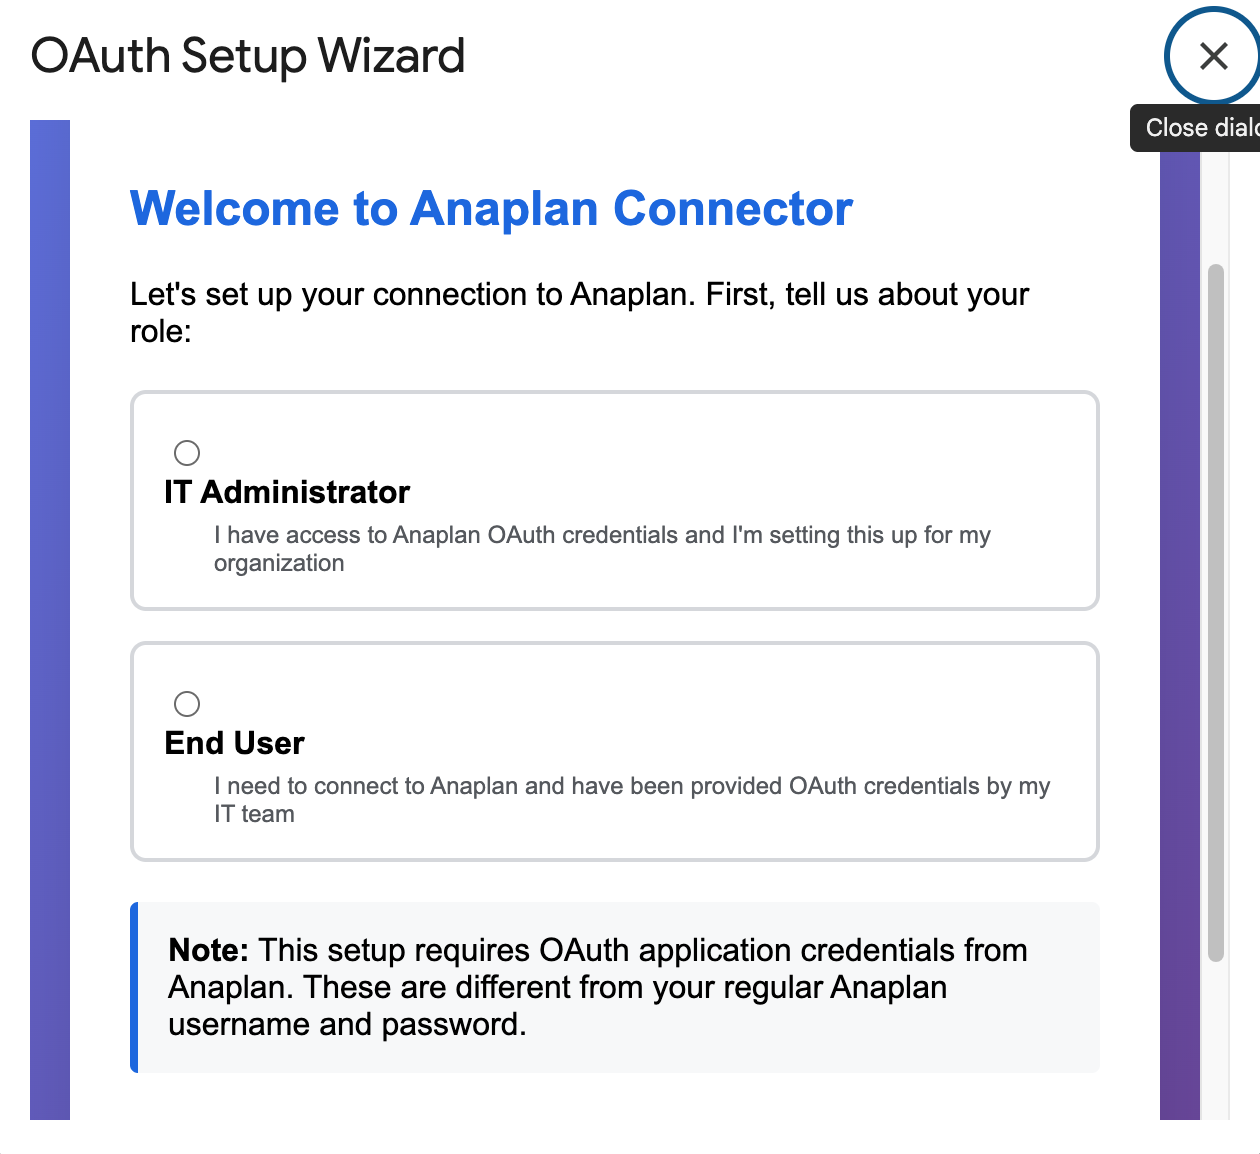 OAuth Setup Wizard welcome screen - Select your role
1.2 Configuring Your Anaplan OAuth Client
The wizard requires you to create an OAuth client in your Anaplan tenant first. Follow these steps:
Step 1: Get the Redirect URI
- In the Setup Wizard, you’ll see a Redirect URI displayed
- Copy this URL - you’ll need it for your Anaplan OAuth client configuration
- Example format:
https://script.google.com/macros/d/{SCRIPT_ID}/usercallback
Step 2: Create OAuth Client in Anaplan
- Log into your Anaplan tenant as an administrator
- Navigate to Administration > OAuth Clients
- Click “Create OAuth Client” or “New Client”
- Configure the OAuth client with these settings:
- Name: “Google Sheets Connector” (or your preferred name)
- Grant Type: Authorization Code
- Redirect URI: Paste the URI you copied from Step 1
- Scopes: Select appropriate data access scopes for your use case
- Save the OAuth client
- Copy the Client ID - you’ll need this in the next step
Important: Some Anaplan tenants may require you to also note the Client Secret. If your OAuth client configuration provides a client secret, copy it as well.
Step 3: Enter Client ID in Setup Wizard
- Return to the OAuth Setup Wizard in Google Sheets
- If you selected End User role, you’ll see the credentials input form
- Paste your Client ID into the “Client ID” field
- Enter the Client Secret in the corresponding field
- Select your Anaplan Region from the dropdown
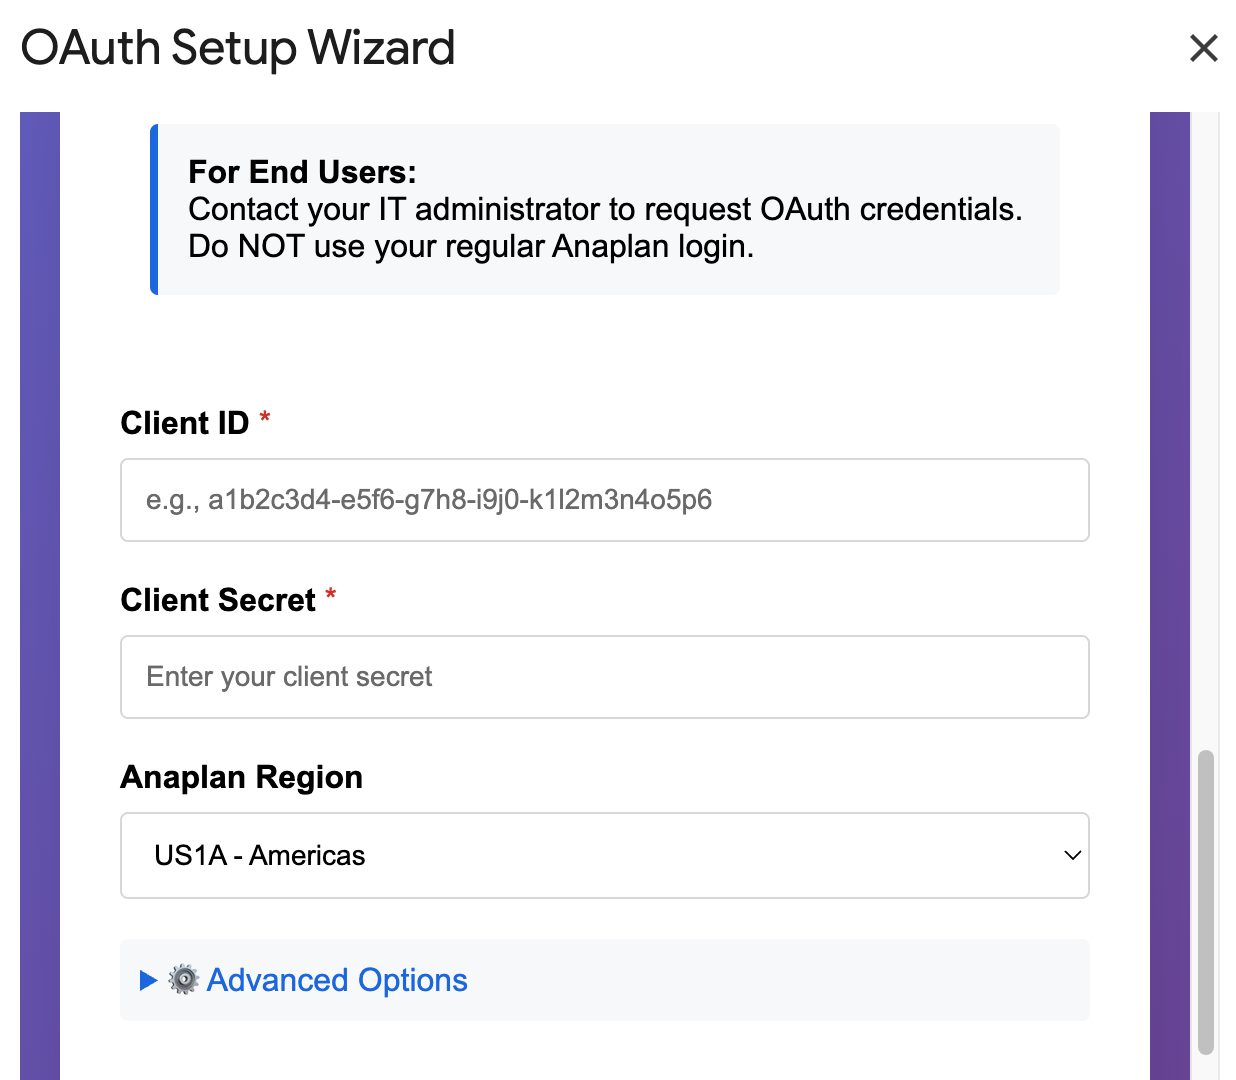 Enter your Client ID, Client Secret, and select Anaplan Region
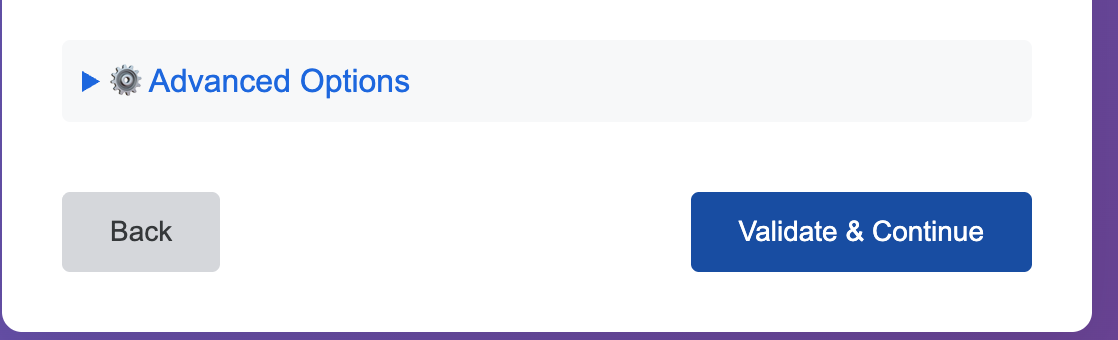 Click “Validate & Continue” to proceed
- Click “Validate & Continue”
Step 4: Verify Setup
- The wizard will validate your configuration and test the connection to Anaplan
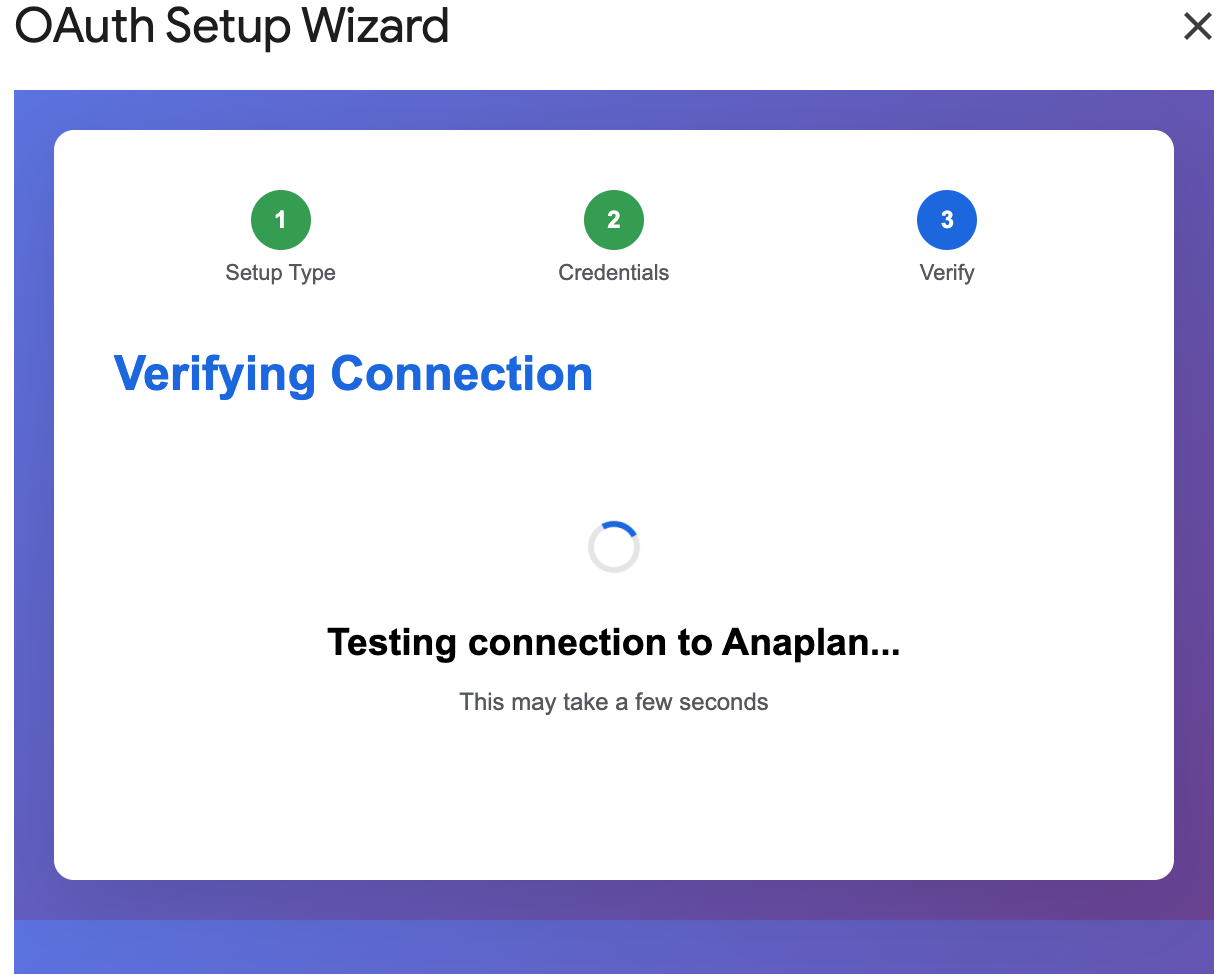 Verifying connection to Anaplan (this may take a few seconds)
- You’ll see a success message: “Connection Successful!”
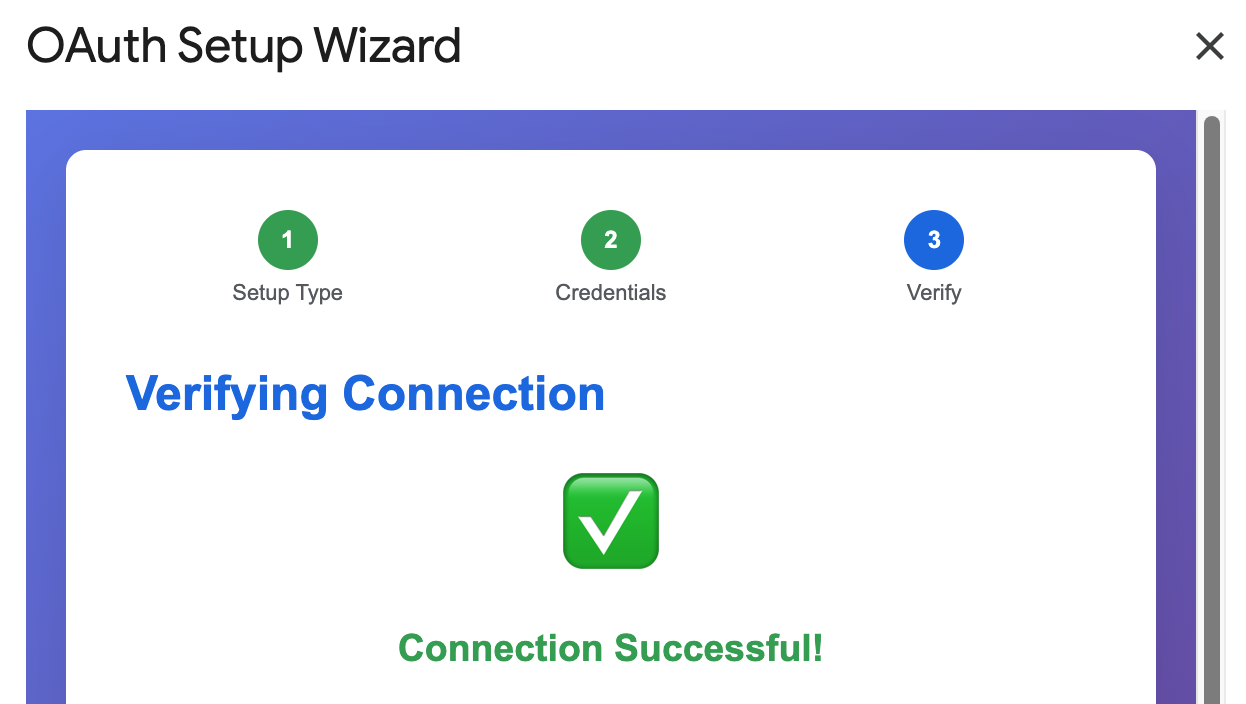 Connection successful - OAuth setup complete!
- Your OAuth setup is now complete!
Troubleshooting:
- “Invalid Client ID” error: Verify you copied the entire Client ID from Anaplan
- “Redirect URI mismatch” error: Ensure the Redirect URI in Anaplan exactly matches the one shown in the wizard
- “Access denied” during login: Check that your Anaplan OAuth client has the correct scopes enabled
2. Authentication Setup
The Anaplan Connector supports two authentication methods. Choose the one that works best for your organization.
2.1 OAuth/SSO Authentication (Recommended)
OAuth/SSO provides the most secure authentication with 90-day token validity, eliminating the need to re-enter credentials frequently. This method is recommended for organizational Anaplan accounts.
Why OAuth/SSO?
- ✓ 90-day token validity - automatic refresh
- ✓ No password storage in Google Sheets
- ✓ Single Sign-On (SSO) support
- ✓ Enterprise security compliance
Steps:
- Open your Google Sheet and navigate to Extensions > Anaplan Connector > Open Sidebar
- In the login section, click on the authentication method selector to expand it
- Select “SSO/OAuth” as your authentication type
- Click the “Login” button to initiate the OAuth flow
- You’ll be redirected to Anaplan’s authorization page - log in with your organizational credentials
- Grant the requested permissions when prompted
- After authorization, you’ll be redirected back to Google Sheets with an authenticated session
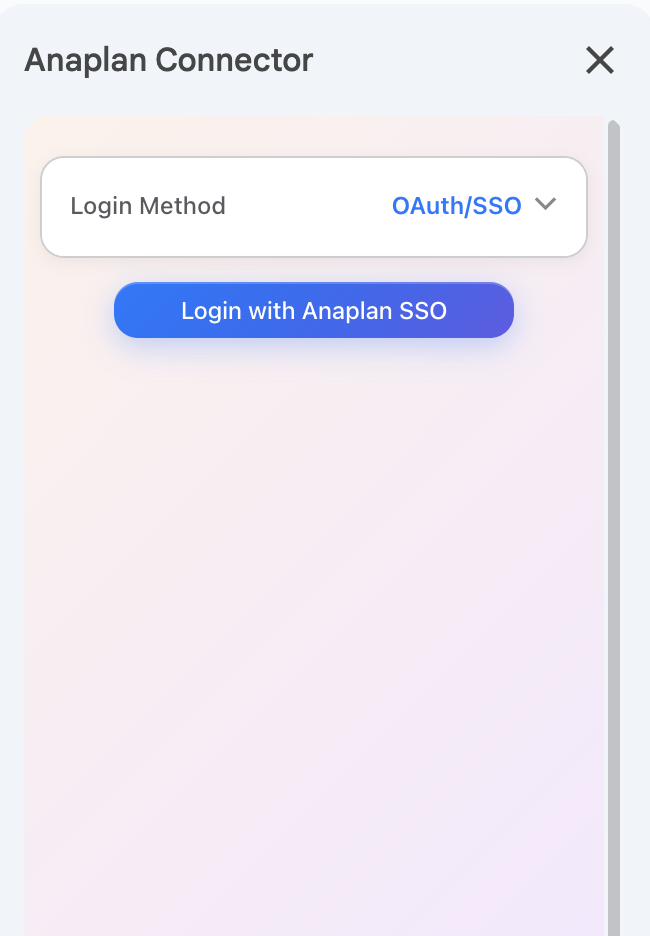 OAuth/SSO login screen - click “Login” to authenticate
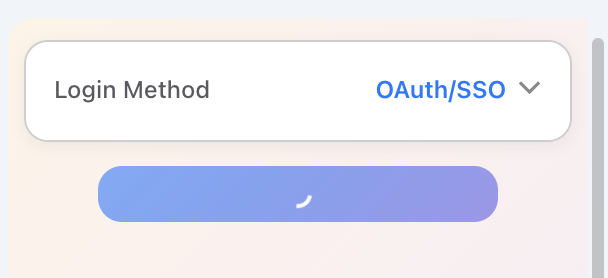 Authentication in progress
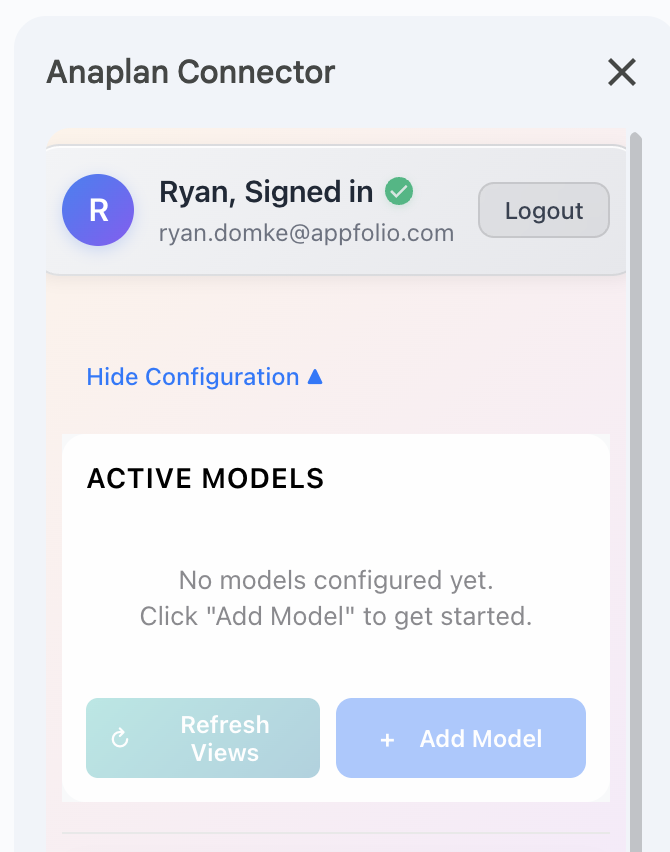 Successfully authenticated - ready to add models
Success! Once authenticated, your OAuth token is valid for 90 days. The connector will automatically refresh it when needed - you won’t need to log in again unless you explicitly log out.
1.2 Basic Authentication (Alternative)
Basic Authentication works with any Anaplan account type, including personal domains. While it requires you to enter your credentials directly, it’s a simple and reliable option.
Note About Basic Auth: Basic Authentication requires entering your Anaplan email and password directly. While your credentials are securely stored in Google’s infrastructure and never leave Google Sheets, OAuth/SSO is recommended for enhanced security.
Steps:
- In the sidebar, click on the authentication method selector
- Select “Basic Auth”
- Enter your Anaplan email address
- Enter your Anaplan password
- Click the “Login” button
- Wait for authentication to complete
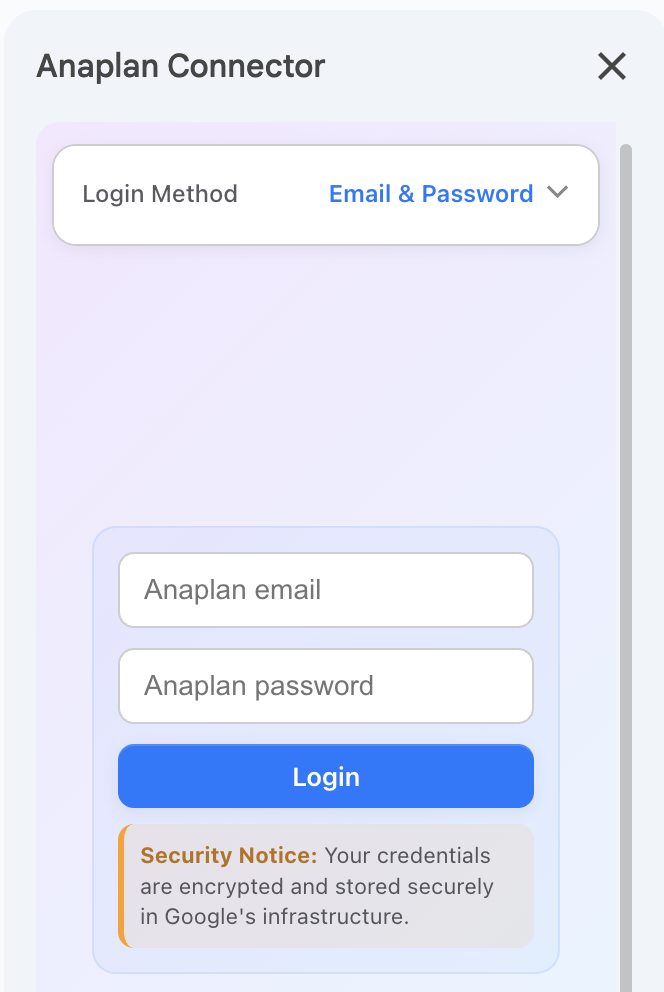 Basic Auth login screen - enter email and password
Authentication in progress
Successfully authenticated - ready to add models
Authenticated! You’re now logged in with Basic Authentication. Your credentials are stored securely in Google’s UserProperties service and are isolated to your user account.
3. Configuration - Multi-Model Setup
Once authenticated, you can connect to multiple Anaplan models from a single spreadsheet. The connector uses an “Active Models” approach that lets you manage which models are available for data retrieval.
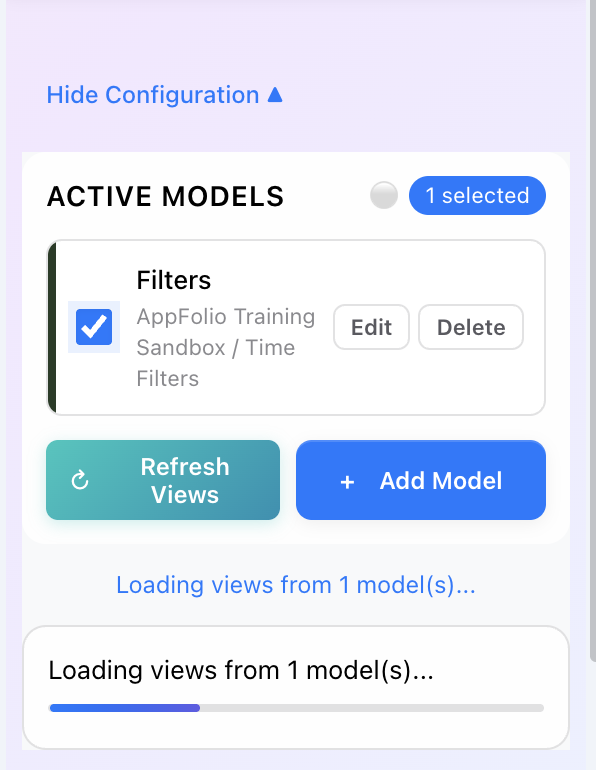
3.1 Active Models Overview
The Active Models section shows all models you’ve configured for this spreadsheet. Each model displays a status indicator showing whether it’s ready for data retrieval.
Understanding Model Status:
- Green dot: Model is open and ready (responded quickly)
- Red dot: Model was closed and needed to wake up (may take 1-2 minutes on first access)
- Checkbox: Toggle to include/exclude model from data operations
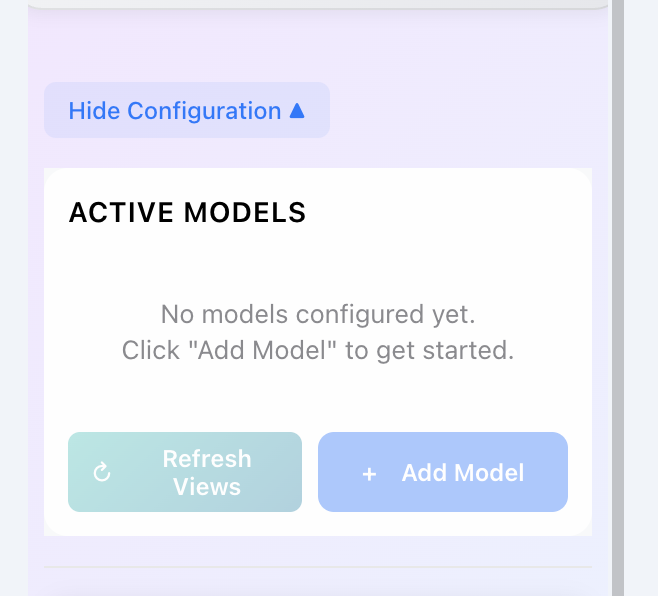 Active Models section showing empty state with “Add Model” button
3.2 Adding a New Model
Click the “Add Model” button to configure a new Anaplan model connection. The dialog uses a cascading selection process.
Steps:
- Click “Add Model” to open the configuration dialog
- Select your Tenant from the dropdown (your Anaplan organization)
- Select a Workspace - the list will populate based on your tenant
- Select a Model - the list will populate based on your workspace
- Click “Save Model” to add this model to your Active Models list
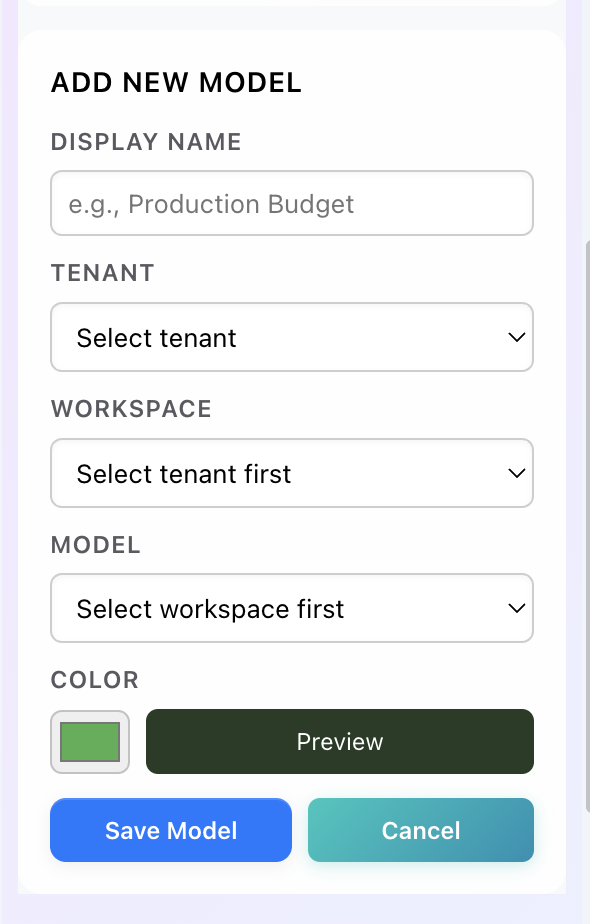 Add Model dialog - select Tenant, Workspace, then Model
Model Added! The model now appears in your Active Models list. You can add multiple models to work with data from different sources in the same spreadsheet.
3.3 Model Loading & Status
When you first access a model or after it’s been idle, Anaplan may need to load it into memory. The connector shows loading progress and timing information.
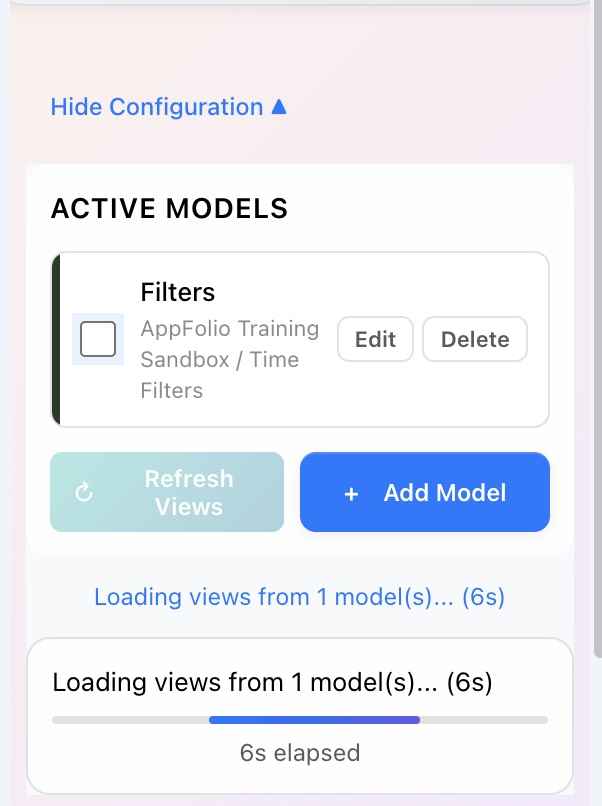 Model loading with progress indicator and elapsed time
 Models loaded and ready for data operations
Model Wake-Up Time: Anaplan models unload from memory after ~60 minutes of inactivity. The first request after this may take 1-2 minutes while the model “wakes up.” Subsequent requests are much faster.
3.4 Fetching Exports
Exports are pre-configured data extractions from Anaplan. They’re typically set up by Anaplan model builders and provide a consistent way to pull specific datasets.
When to Use Exports:
- Pre-configured, standardized data extracts
- Data that’s been specifically formatted for reporting
- Consistent, repeatable data pulls
- Data that doesn’t require filtering or customization
Steps:
- With your workspace and model selected, click “Fetch Exports”
- The connector will retrieve all available exports from your selected model
- A dropdown list will populate showing all available exports
- Select an export from the dropdown
- Click “Save Configuration”
- The current sheet will be configured to pull data from that export
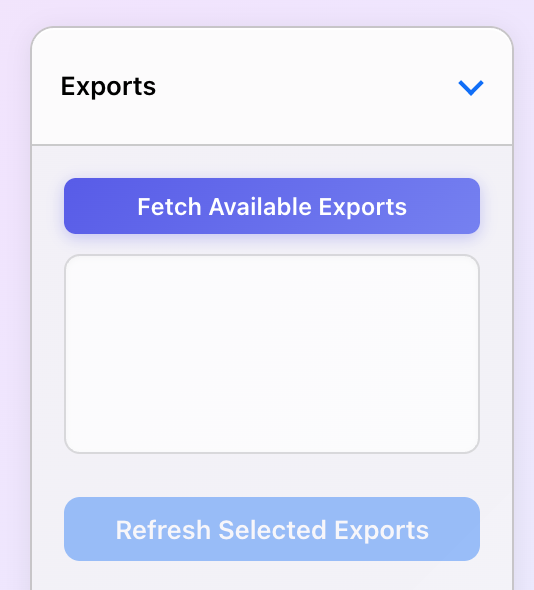 “Fetch Exports” button
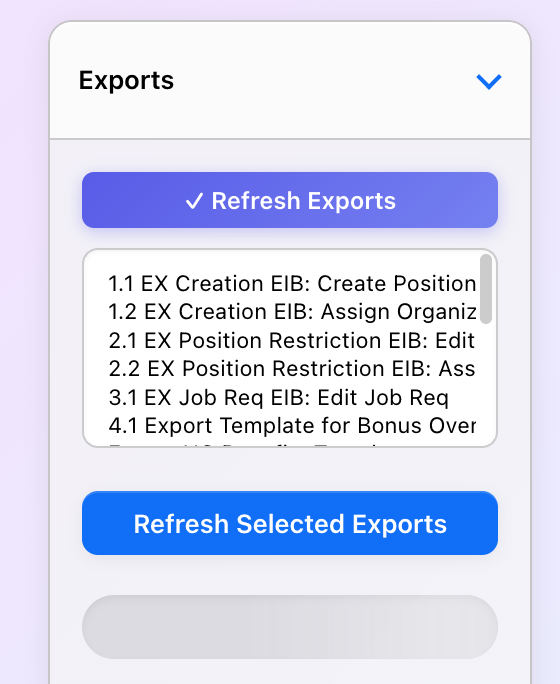 Export list populated
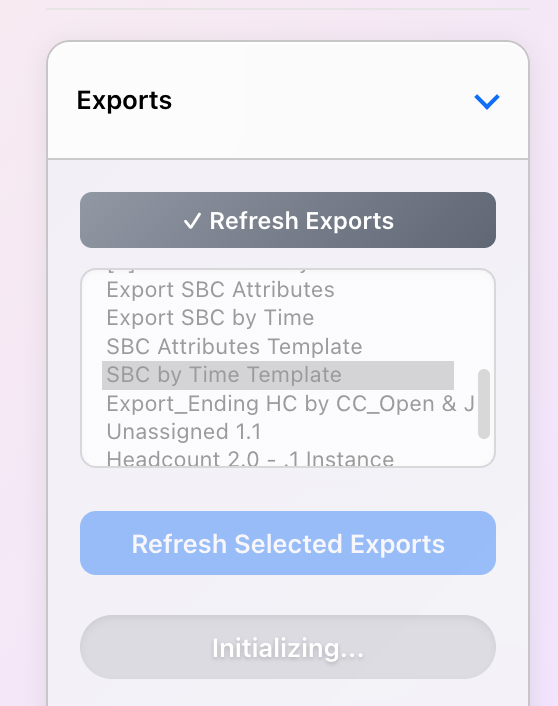 Selecting an export
 Export configured and saved
Export Configured! Your sheet is now configured to pull data from the selected Anaplan export. You can refresh this data at any time using the Refresh Sheets feature.
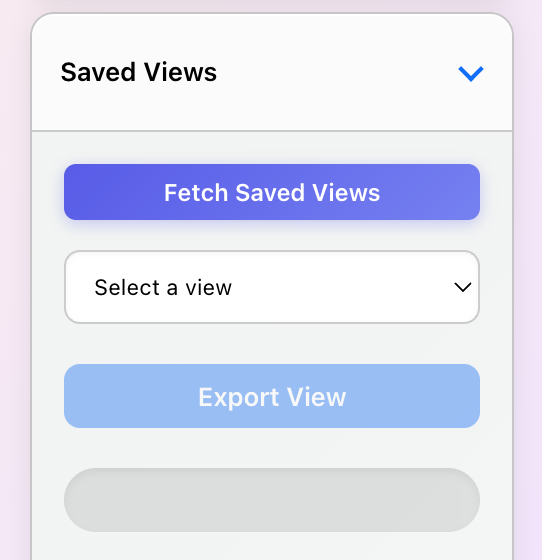
3.5 Fetching Saved Views
Saved Views provide more flexibility than exports. They allow you to filter data by dimensions (page selectors) and customize what data you pull.
When to Use Saved Views:
- Filtered data (specific time periods, regions, products, etc.)
- Customizable data pulls with page selectors
- Ad-hoc analysis with different filter combinations
- More control over the data returned
Steps:
- With your workspace and model selected, click “Fetch Views”
- The connector will retrieve all saved views from your selected model
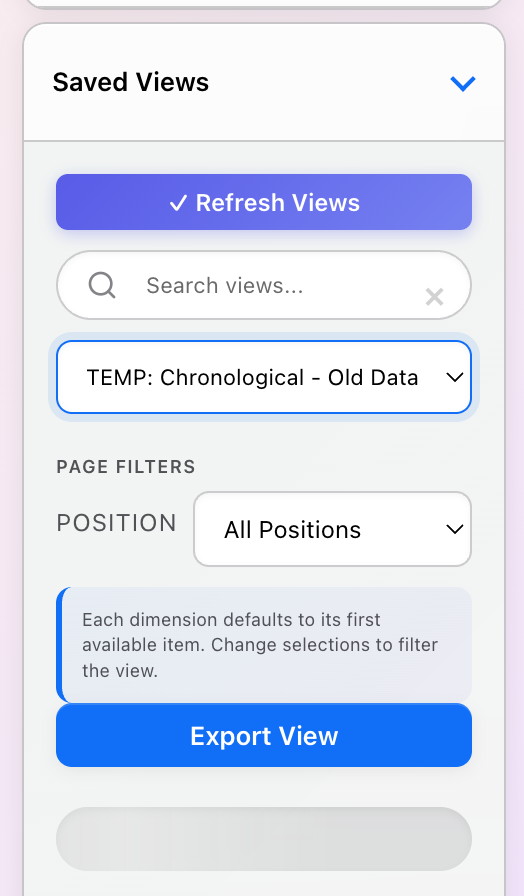
- Select a view from the dropdown
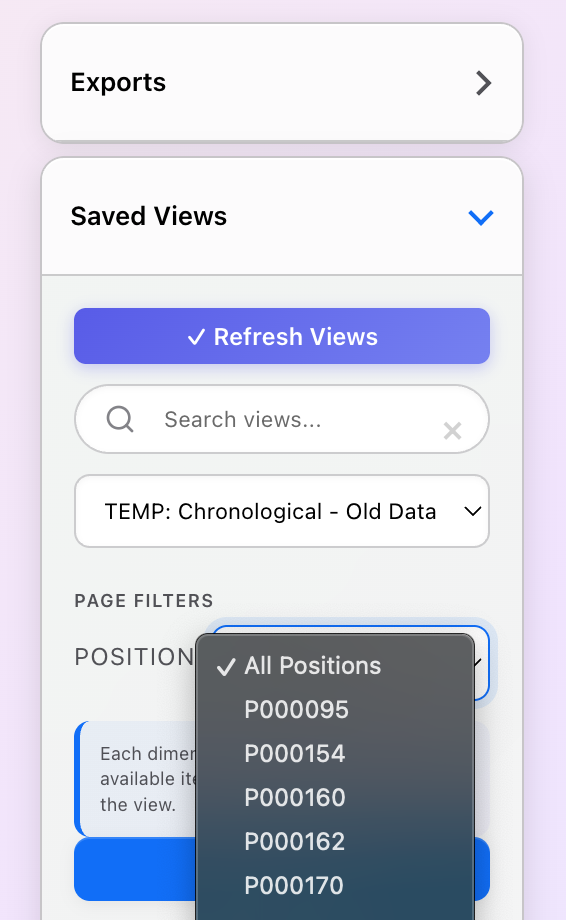
- If the view has dimensions (filters), you’ll see page selector dropdowns appear
- For each dimension, select the specific item(s) you want to filter by
- Click “Save Configuration”
- The current sheet will be configured with your view and filters
 “Fetch Views” button
 Views list with filters/dimensions
 Configuring page selectors (filters)
 View configured and saved
View Configured! Your sheet is now configured to pull filtered data from the selected Anaplan saved view. Each time you refresh, the data will update with your specified filters applied.
Important: Page Selectors Use IDs, Not Names
The connector uses internal Anaplan IDs for page selectors, not display names. Always select items from the dropdown rather than typing names manually. The sidebar handles this automatically - you’ll see readable names but the correct IDs are used behind the scenes.
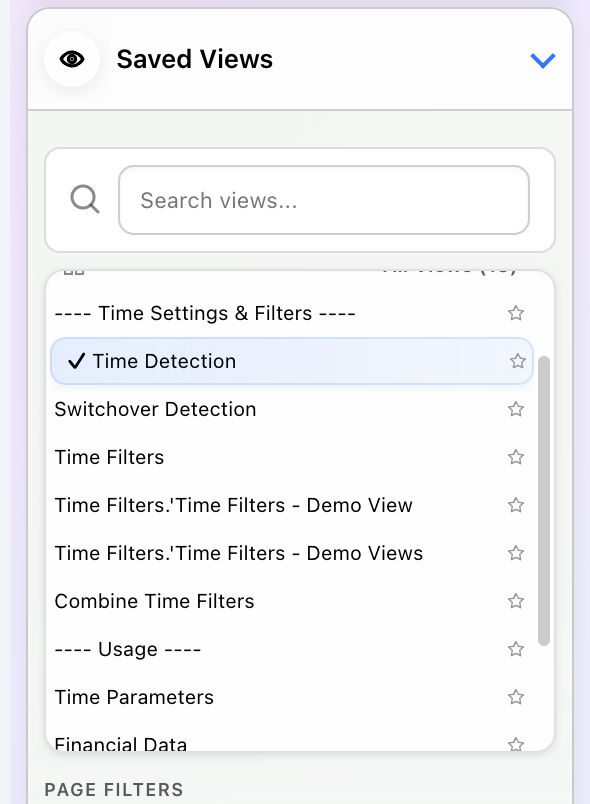 Saved Views list with available views
 Configuring page filters (dimensions) for a saved view
3.6 Pivot Views (Advanced)
Pivot Views allow you to restructure the dimensions of a saved view, controlling which dimensions appear as rows, columns, or page filters.
When to Use Pivot Views:
- Custom data layouts not available in standard saved views
- Transposing row/column dimensions for different analysis perspectives
- Creating specific report formats for downstream use
Steps:
- After selecting a Saved View, click the “Configure Pivot” button
- The Pivot Configuration dialog opens with three drop zones:
- Rows: Dimensions that will appear as rows in your output
- Columns: Dimensions that will appear as column headers
- Pages: Dimensions used as filters (page selectors)
- Drag and drop dimensions between zones to restructure the view
- Use the hierarchy selector to expand/collapse dimension levels
- Click “Apply Pivot” to save your configuration
- The sheet will be configured with your custom pivot layout
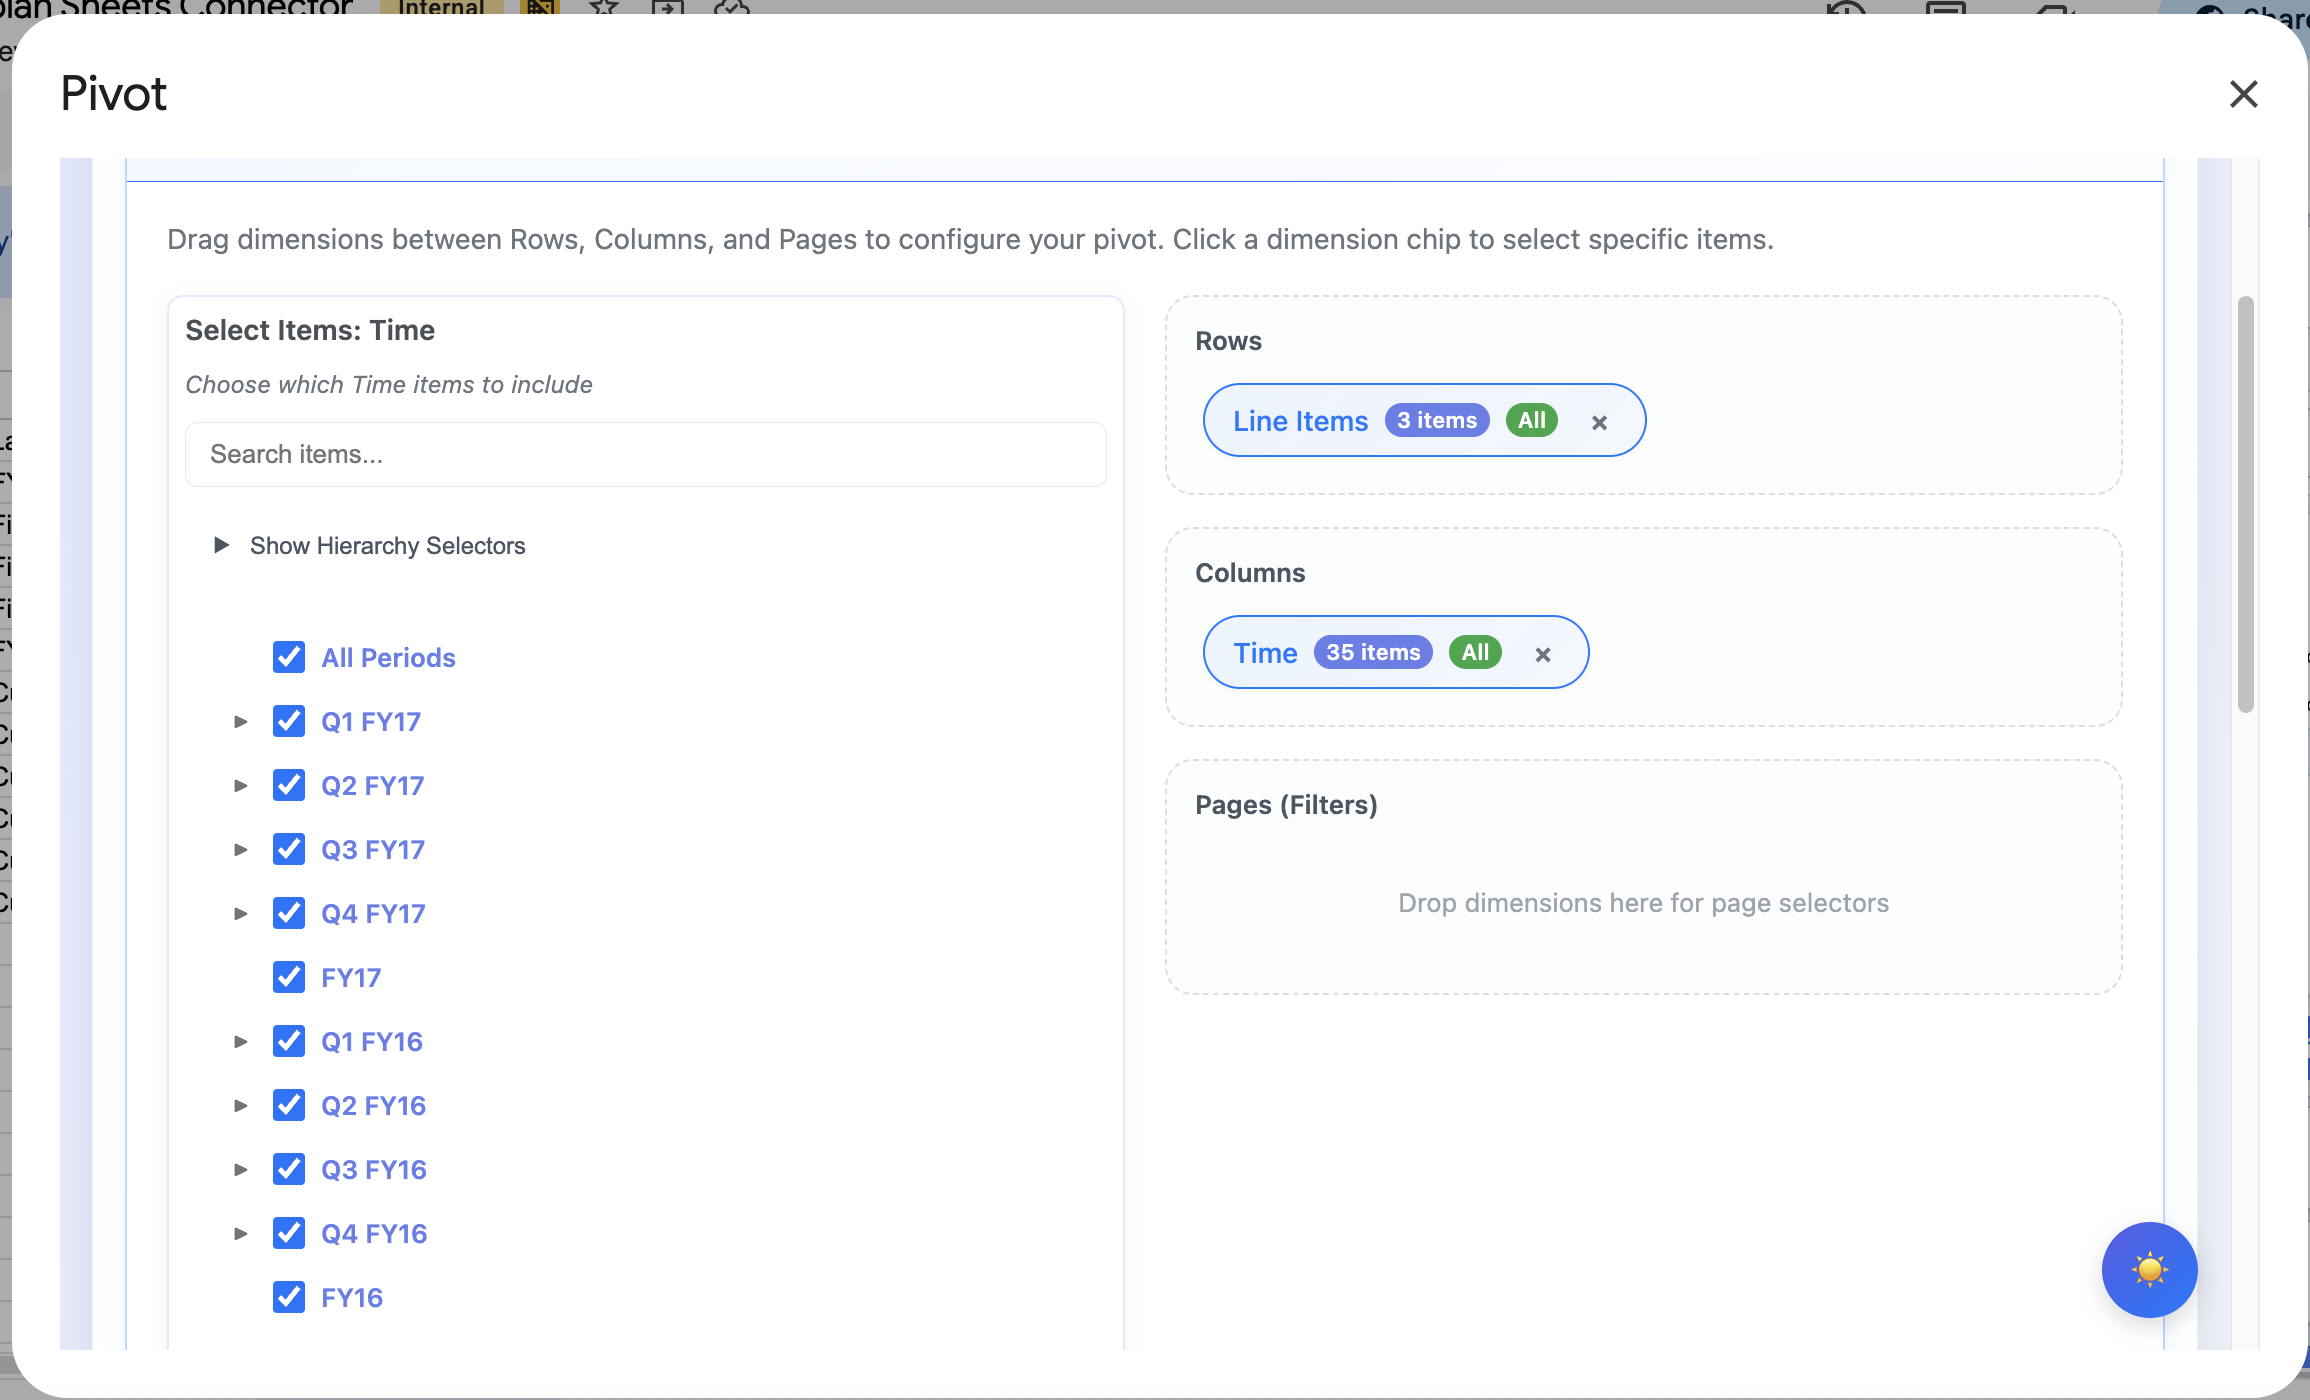 Pivot configuration dialog - drag dimensions between Rows, Columns, and Pages
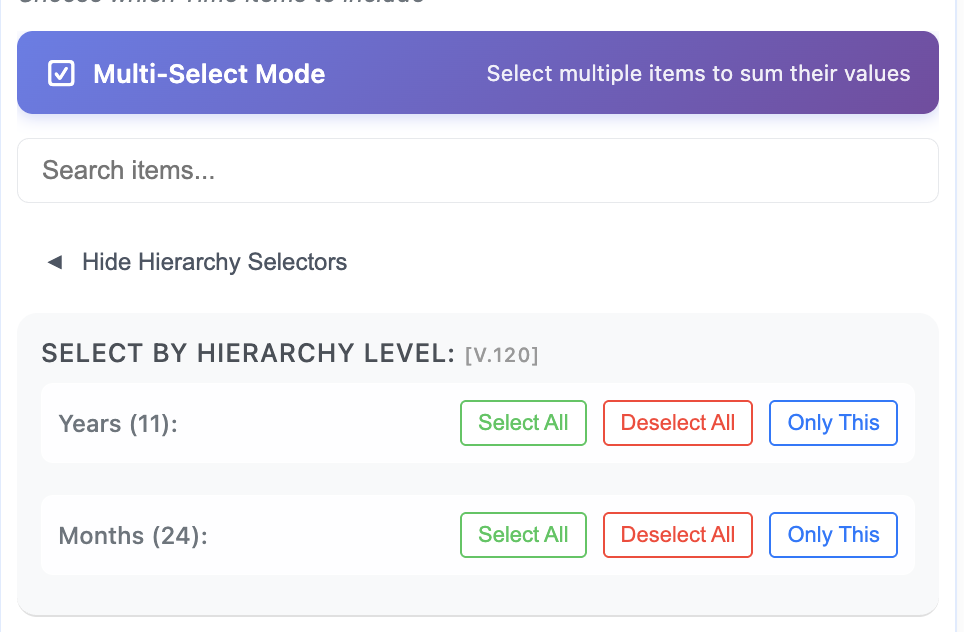 Hierarchy selector for expanding/collapsing dimension levels
Pivot Applied! Your view now has a custom layout. The pivot configuration is saved with the sheet and will be applied on each refresh.
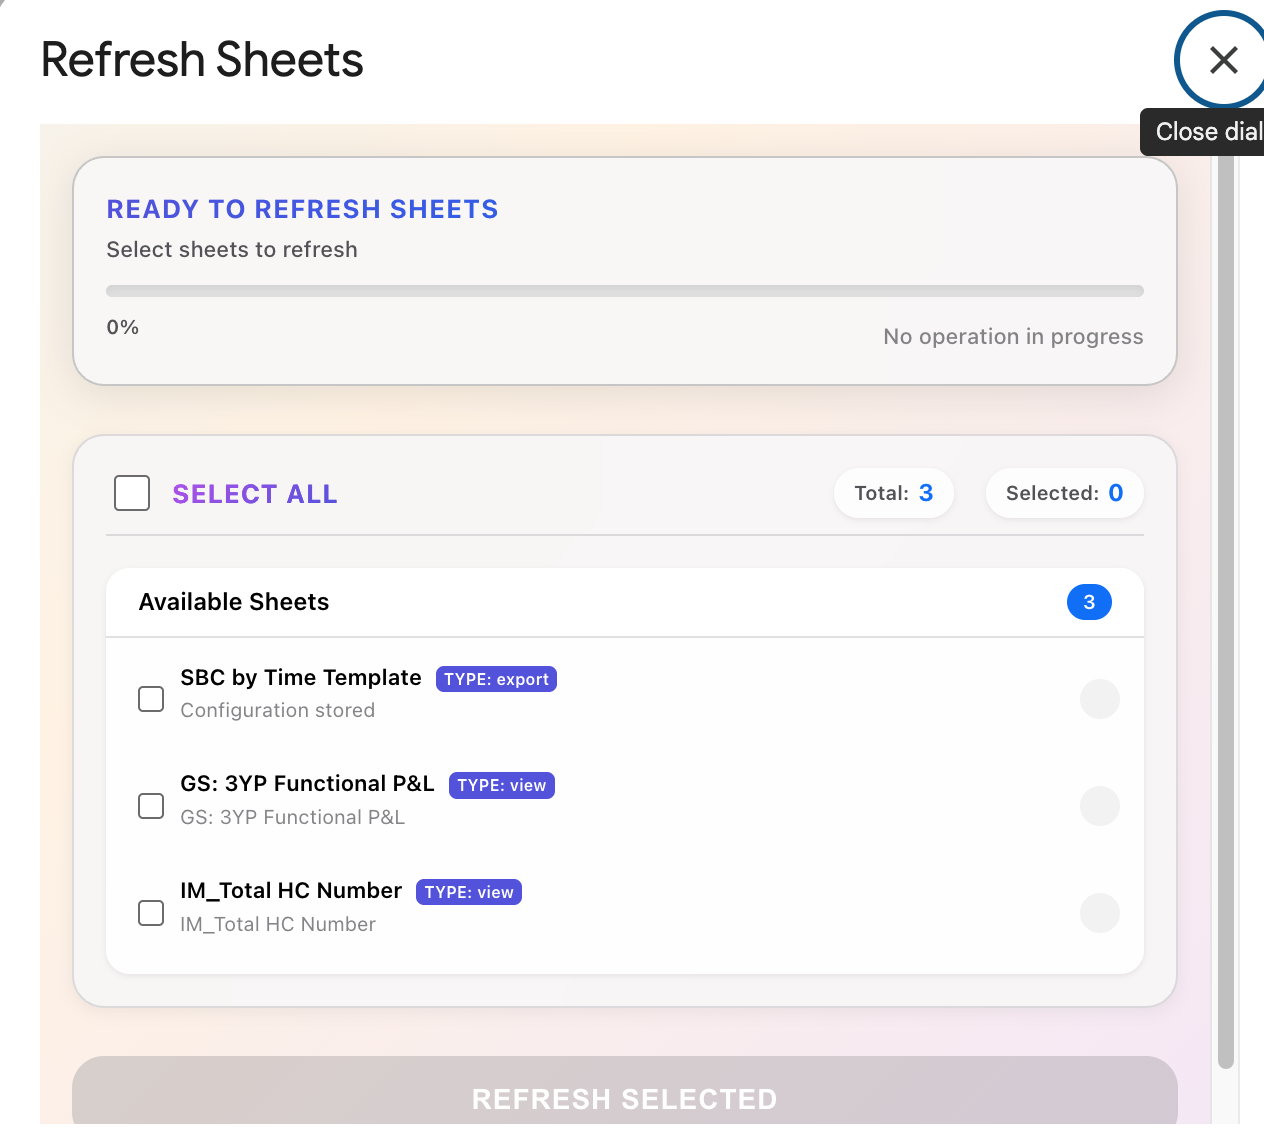
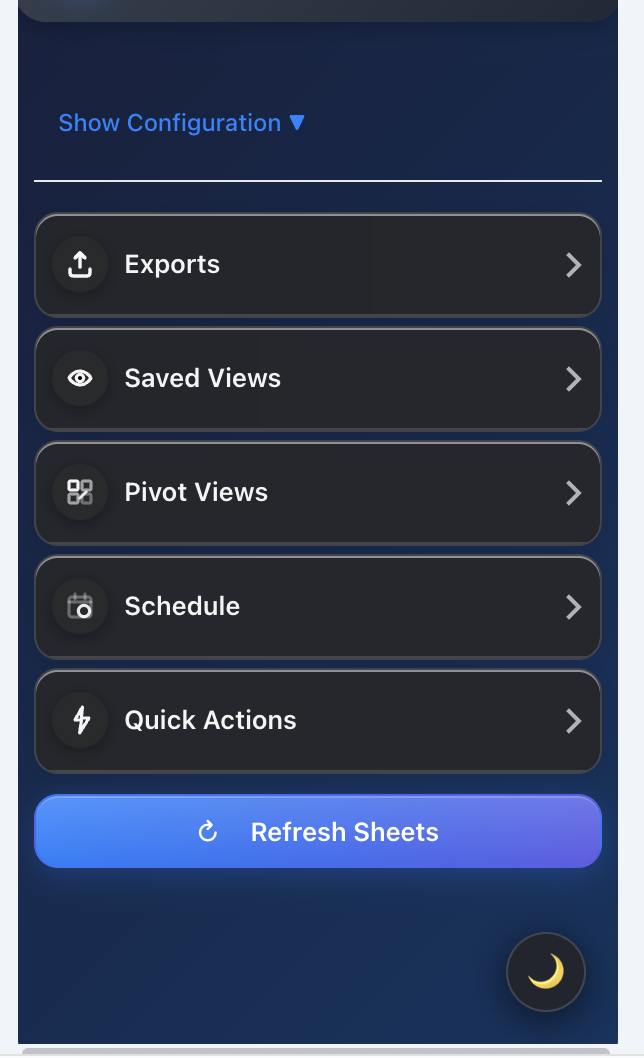
4. Refresh Sheets - Batch Data Updates
The Refresh Sheets feature allows you to update multiple configured sheets at once with intelligent batching and progress tracking.
4.1 Understanding the Refresh Sheets Interface
The Refresh Sheets interface provides a centralized view of all your configured sheets and allows you to refresh them individually or in batches.
Intelligent Batching Features:
- Dataset Analysis: Automatically categorizes sheets by size (small, medium, large, extra-large)
- Smart Grouping: Groups similar-sized sheets together for efficient parallel processing
- Self-Learning: Remembers historical performance data to improve future refresh operations
- Model Grouping: Shows which Anaplan model each sheet belongs to
Steps:
- Click the “Refresh Sheets” button in the sidebar
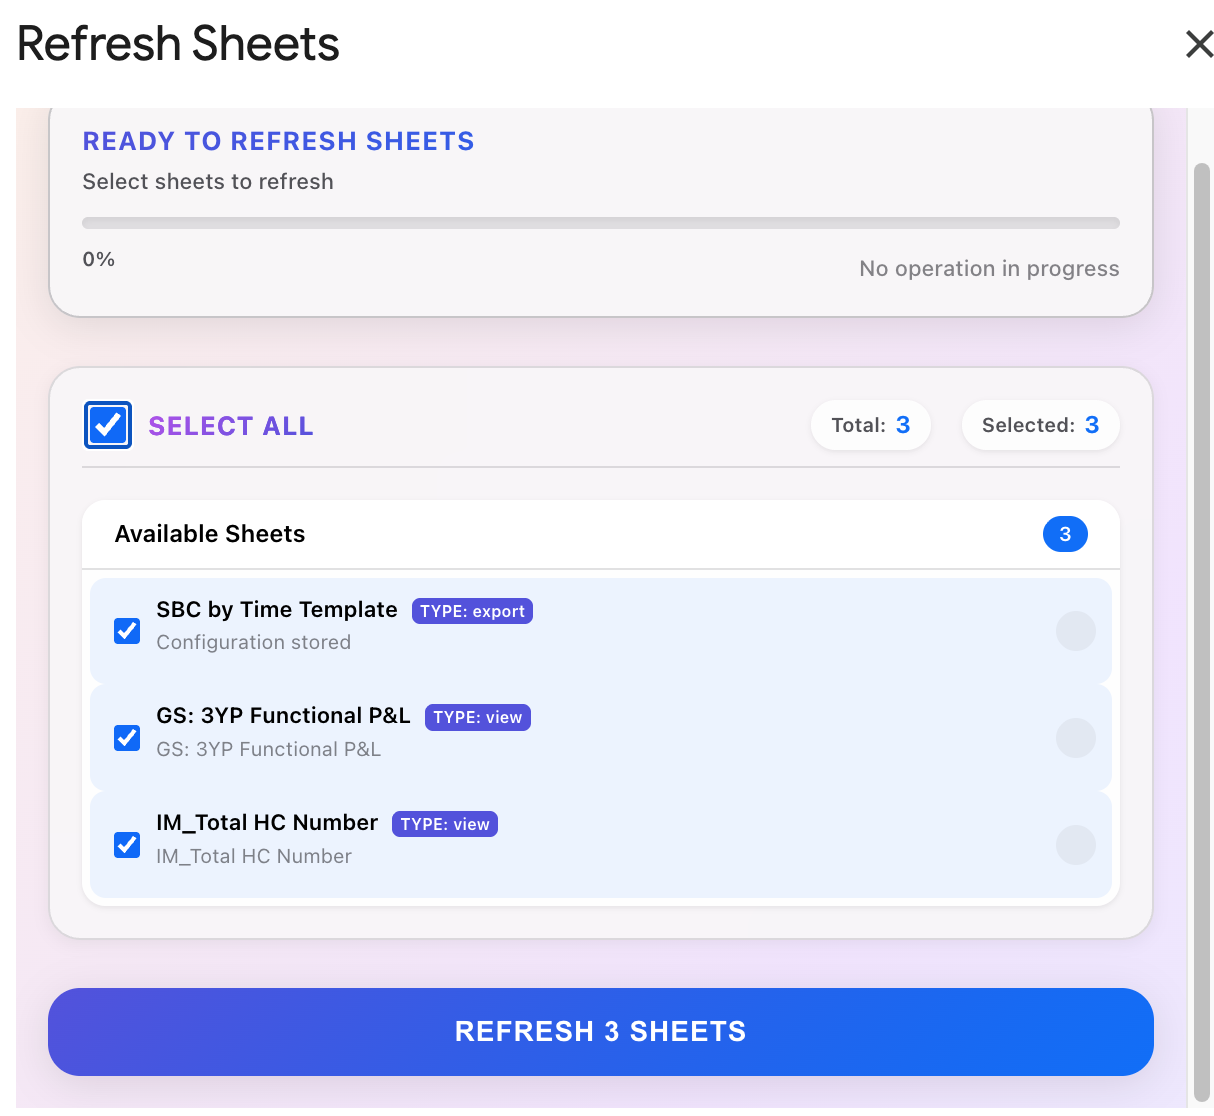
- A modal dialog will appear showing all configured sheets in your workbook
- Sheets are grouped by their source Anaplan model (if using multi-model feature)
- Each sheet shows a checkbox for selection and its configuration type (Export or View)
 Refresh Sheets dialog showing configured sheets grouped by model
4.2 Running a Batch Refresh
Once you’ve selected the sheets you want to refresh, the connector handles everything automatically with real-time progress updates.
Steps:
- Check the boxes next to the sheets you want to refresh (or use “Select All”)
- Click “Refresh Selected”
- Watch the progress indicators:
- Batch Progress: Shows which batch is currently processing (e.g., “Batch 2 of 4”)
- Sheet Progress Bars: Individual progress for each sheet (0-100%)
- Status Messages: Real-time updates like “Fetching data”, “Writing to sheet”, etc.
- When complete, you’ll see a summary showing how many sheets succeeded
- Check your sheets - data is updated and a timestamp appears in cell B1
 “Refresh Selected” button clicked
 Progress indicators (batch X/Y, sheet progress bars)
 Completion summary (X/Y succeeded)
 Updated sheet with timestamp in B1
Expected Performance:
- Small datasets (< 5,000 cells): 2-4 seconds
- Medium datasets (5,000-20,000 cells): 4-8 seconds
- Large datasets (20,000-50,000 cells): 8-15 seconds
- Extra-large datasets (> 50,000 cells): 15-30 seconds
Batch optimization typically reduces total time by 15-20% compared to sequential processing.
Automatic 401 Recovery: If your authentication token expires during a refresh (rare with 90-day OAuth tokens), the connector will automatically refresh it and retry the operation. You won’t need to manually log in again!
5. Scheduling - Automated Refreshes
Set up automated schedules to refresh your Anaplan data at regular intervals without manual intervention.
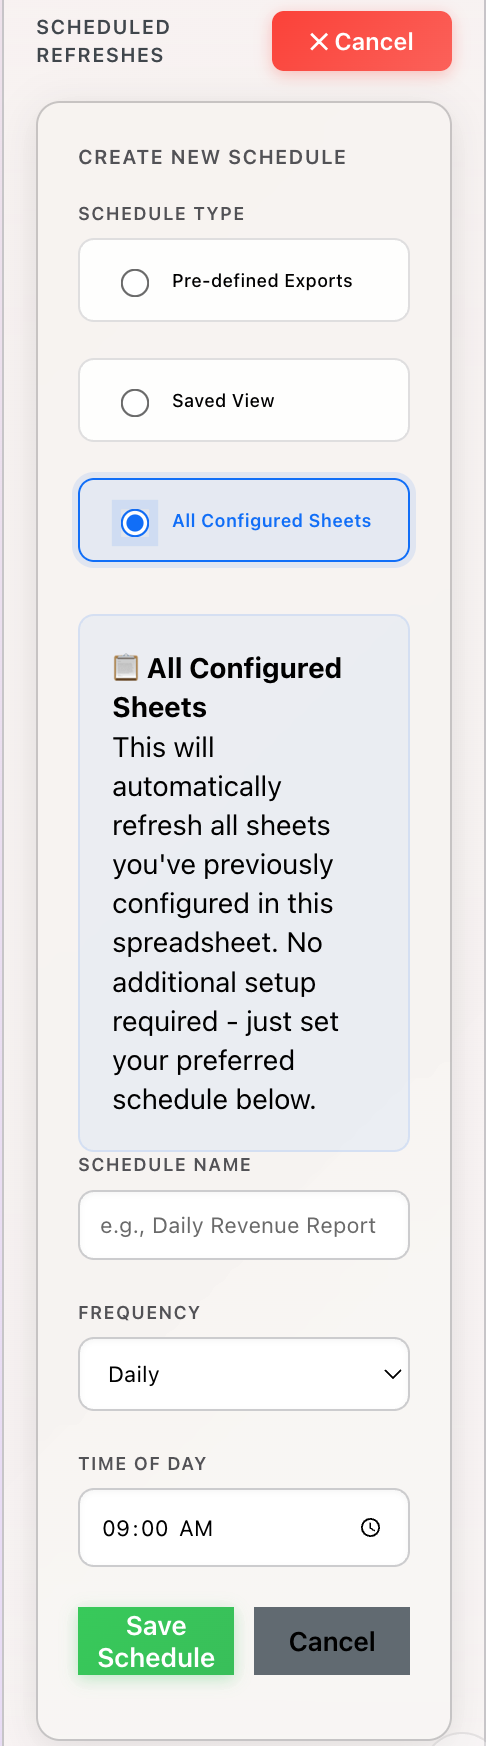
5.1 Creating a Schedule
Schedules use Google Apps Script time-based triggers to automatically refresh your configured sheets and send email notifications with results.
Schedule Features:
- Four frequency types: Hourly, Daily, Weekly, Monthly
- Flexible timing: Choose specific hours, days, or intervals
- Email notifications: Get notified when refreshes complete with clickable spreadsheet link
- Automatic token validation: Checks authentication before running
- Smart execution: Prevents overlapping runs and drift in hourly schedules
Steps:
- Expand the “Schedule” section in the sidebar
- Click the Frequency dropdown and select your desired schedule type:
- Hourly: Run every N hours (1-24)
- Daily: Run at a specific time each day
- Weekly: Run on specific day(s) at a specific time
- Monthly: Run on a specific day of the month at a specific time
- Configure the schedule settings based on your selection:
- For hourly: Select hour interval (e.g., every 2 hours)
- For daily: Select time of day
- For weekly: Select day(s) of week and time
- For monthly: Select day of month and time
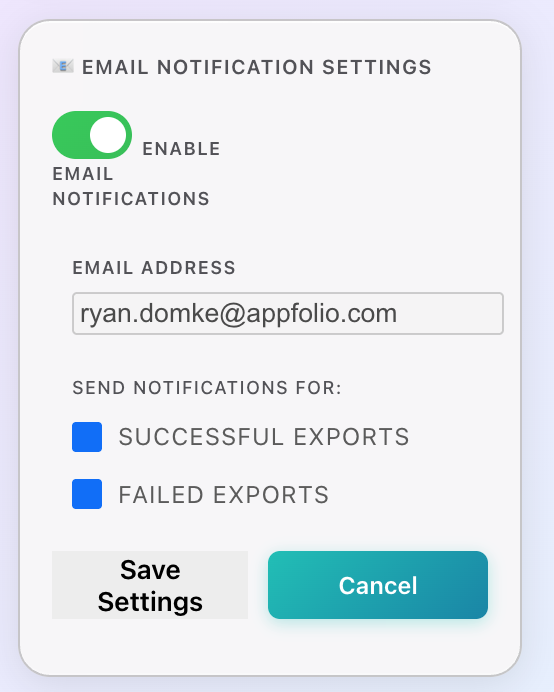
- Enter your email address for notifications
- Click “Create Schedule”
- Confirm the schedule creation
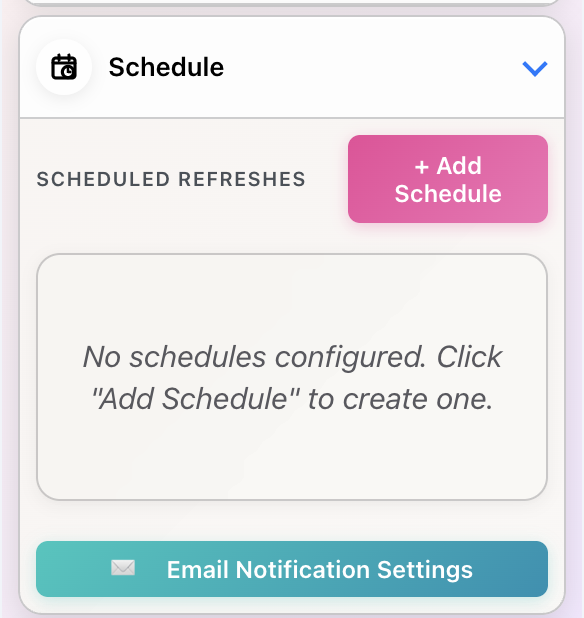 Schedule section expanded
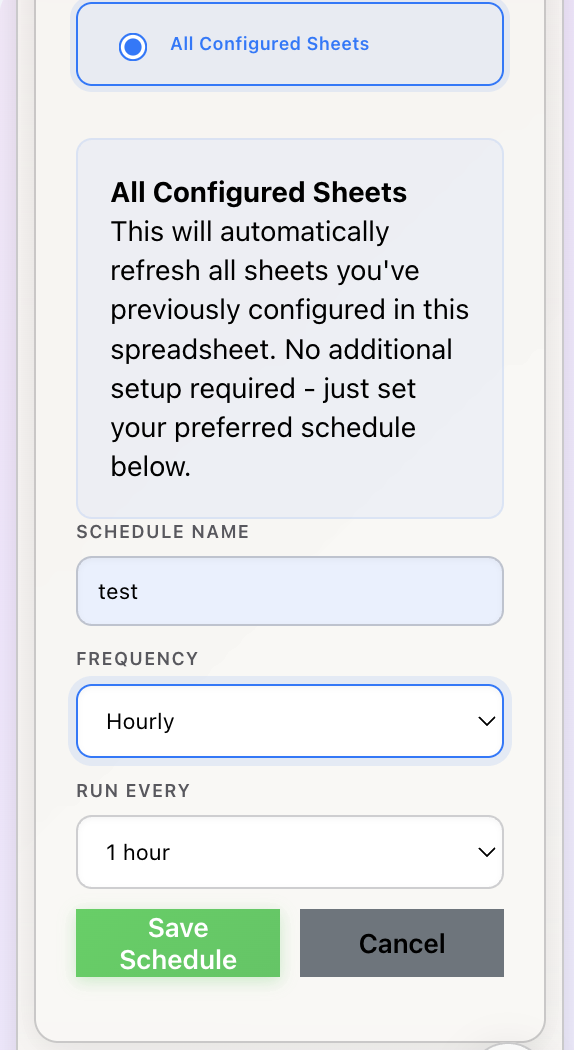 Schedule form - frequency, time, and email notification settings
Time Zone Notice: Schedules run in your Google account’s time zone. Make sure your Google account time zone settings match your intended schedule time zone.
Schedule Created! Your schedule is now active. The first run will occur at the next scheduled time. You’ll receive an email notification with the results, including a direct link to view your spreadsheet.
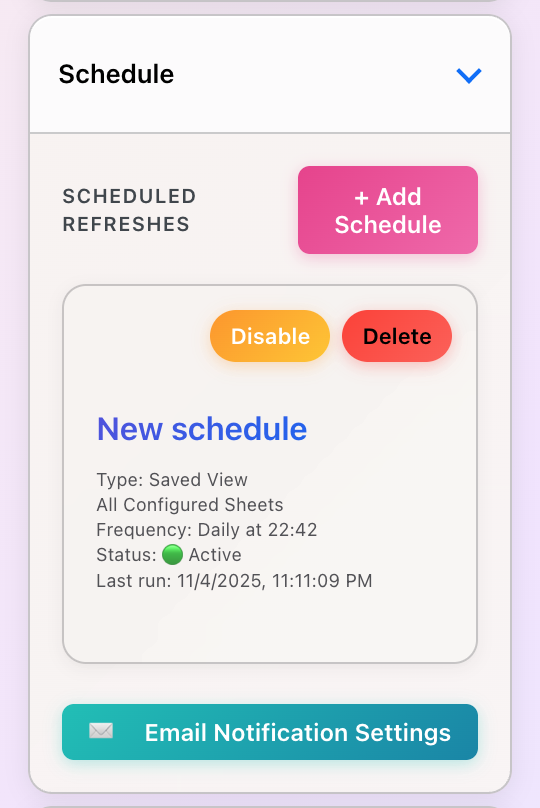
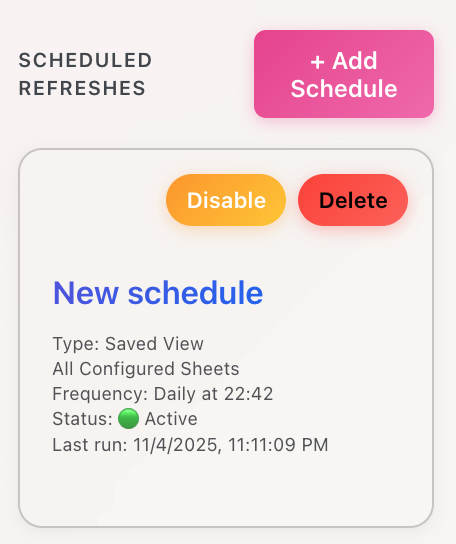
5.2 Managing Schedules
View, edit, and manage all your active schedules from the Schedule section.
Steps:
- The Schedule section shows a list of all active schedules
- Each schedule displays:
- Frequency type and settings
- Email notification address
- Last run time (if applicable)
- Status (Active/Disabled)
- To disable a schedule, click “Disable Schedule”
- To delete a schedule permanently, click “Delete Schedule”
Email Notifications Include:
- Success/failure status
- Number of sheets refreshed
- Duration of the operation
- Direct link to view your spreadsheet
- Any error messages or warnings
Authentication and Schedules: Schedules require valid authentication to run. The connector automatically validates your auth token before executing scheduled refreshes. If your token has expired and can’t be refreshed automatically, you’ll receive a notification email and the schedule will be disabled to prevent repeated failures.
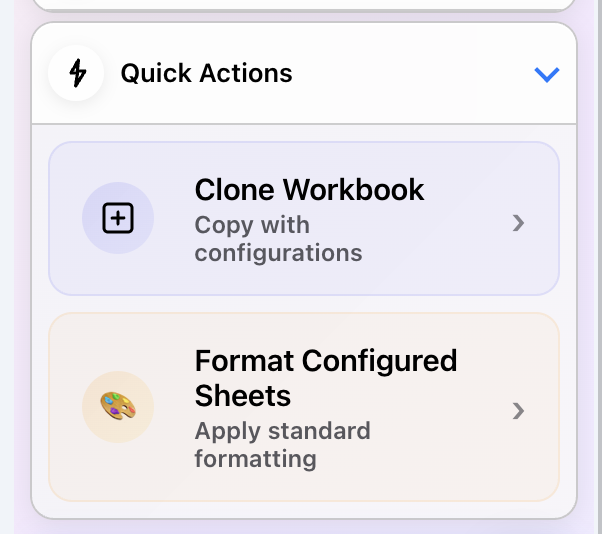
6. Quick Actions - Formatting & Cloning
Quick Actions provide powerful utilities for managing your Anaplan data in Google Sheets.
6.1 Format Configured Sheets
Automatically apply professional formatting to all your Anaplan-configured sheets with a single click.
What Gets Formatted:
- Header row (row 1): Bold text, colored background, centered alignment
- Timestamp cell (B1): Highlighted background to clearly show last update time
- Data columns: Proper width adjustment for readability
- Number formatting: Appropriate formats for currency, percentages, dates
- Borders: Clean gridlines for better data visualization
- Freeze panes: Locks header row for easier scrolling
Steps:
- Expand the “Quick Actions” section in the sidebar
- Click “Format Configured Sheets”
- The connector will identify all sheets with Anaplan configurations
- Formatting is applied to each sheet automatically
- You’ll see a success message listing which sheets were formatted
 Quick Actions section with Format and Clone options
Formatting Complete! All your configured sheets now have consistent, professional formatting. You can re-run this anytime to reapply formatting if you’ve made manual changes.
6.2 Clone Workbook with Configurations
Create a complete copy of your workbook while preserving all Anaplan sheet configurations - perfect for templates, backups, or sharing with team members.
What Gets Cloned:
Copied to the clone:
- ✓ All sheets and their data
- ✓ Sheet configurations (export/view settings, filters)
- ✓ Workspace and model IDs
- ✓ Sheet structure and formatting
NOT copied (security & technical limitations):
- ✗ Authentication tokens (users must log in separately)
- ✗ Schedules (must be recreated in cloned workbook)
- ✗ User preferences (dark mode, etc.)
Steps:
- In the Quick Actions section, click “Clone Workbook”
- A confirmation dialog will appear explaining what will be cloned
- Confirm that you want to proceed
- The connector creates a copy of your workbook with a “Copy of [name]” title
- All sheet configurations are temporarily stored for transfer
- A success message appears with a direct link to open the cloned workbook
- Click the link to open the cloned workbook
- When the cloned workbook opens, configurations are automatically applied
- Users of the cloned workbook will need to log in separately
Workbook Cloned Successfully! Your cloned workbook has all the same sheet configurations as the original. Team members can open it, log in with their own Anaplan credentials, and immediately start refreshing data without reconfiguring anything.
Configuration Transfer Process: The clone operation uses a two-step process: First, configurations are stored temporarily in UserProperties. Then, when you open the cloned workbook, those configurations are automatically transferred to the new workbook’s DocumentProperties. The cloned workbook must be opened at least once to complete the configuration transfer.
7. Dark Mode
The Anaplan Connector includes a beautiful dark mode with iOS-style design, perfect for low-light environments and reducing eye strain.
Dark Mode Features:
- iOS-inspired design: Follows Apple Human Interface Guidelines
- OLED-friendly: Pure black background (#000000) for energy efficiency on OLED displays
- Persistent preference: Your choice is saved and remembered across sessions
- Smooth transitions: 0.3s animations for a polished feel
- All UI elements: Every component supports dark mode (inputs, buttons, cards, etc.)
Steps:
- Look for the dark mode toggle button in the bottom-right corner of the sidebar
- It shows a ☀️ sun icon in light mode, 🌙 moon icon in dark mode
- Click the toggle to switch between light and dark modes
- Watch the smooth transition as all colors change
- Your preference is automatically saved
- The sidebar will open in your preferred mode next time
 Dark mode with OLED-friendly colors
Dark Mode Activated! The sidebar is now in dark mode with OLED-friendly colors. Your preference is stored in Google’s UserProperties service and will persist across sessions and even different spreadsheets!
8. Multi-Model Support (Advanced)
Advanced users can configure different sheets in the same workbook to pull data from different Anaplan models - a powerful feature for consolidated reporting.
Multi-Model Capabilities:
- Each sheet remembers its model: Configurations include workspace/model IDs
- Intelligent refresh: Refresh Sheets groups by model and handles authentication per model
- Model badges: Visual indicators show which model each sheet belongs to
- Cross-model batching: The connector optimizes batch processing even across models
- No conflicts: Page selectors and filters are model-specific
How Multi-Model Works
Steps:
- Configure one sheet with data from Model A (select Model A in Configuration)
- Switch to a different sheet in the same workbook
- Select Model B in the Configuration section
- Configure this sheet with data from Model B
- Repeat for as many models as needed
- When you open Refresh Sheets, you’ll see sheets grouped by model
- Each model group shows a badge and count
- Refresh works seamlessly across all models in a single operation
Use Cases for Multi-Model:
- Consolidated reporting: Pull sales data from one model, finance from another
- Cross-functional dashboards: Combine HR, operations, and finance data
- Development vs. Production: Compare data from test and production models
- Multi-region reporting: Each region has its own model, consolidate in one sheet
Important: Re-save Legacy Configurations
Sheets configured before the multi-model feature was added may not have stored model IDs. If you see a warning about “legacy configurations” in Refresh Sheets, simply re-save each sheet’s configuration while connected to its source model. The connector will capture and store the model IDs for future refreshes.
9. Troubleshooting & FAQs
Common Issues & Solutions
Authentication Failures
Issue: Login fails or shows “Not Authenticated” error
Solutions:
- OAuth users: Ensure you’re using an organizational domain email (not personal @gmail.com)
- Basic Auth users: Verify your email and password are correct
- Both: Try logging out and logging back in
- Check: Make sure you have the correct permissions in Anaplan
- Browser cache: Clear your browser cache and try again
Missing Exports or Views
Issue: “Fetch Exports” or “Fetch Views” returns empty or missing items
Solutions:
- Permissions: Verify you have access to the workspace/model in Anaplan
- Exports: Ensure exports exist and are published in the Anaplan model
- Views: Confirm saved views exist in the target module
- Model selection: Double-check you’ve selected the correct model
- Retry: Click “Fetch” again - sometimes API calls can time out
Refresh Errors
Issue: Sheets fail to refresh or show errors
Solutions:
- Token validity: Your auth token may have expired - log out and log back in
- Automatic recovery: The connector tries to auto-refresh expired tokens (v.77+)
- Check logs: Open View > Logs in Apps Script editor for detailed error messages
- Network: Verify your internet connection is stable
- Anaplan availability: Check if Anaplan’s service is operational
- Page selectors: Ensure filters (page selectors) use valid item IDs
Schedule Not Running
Issue: Scheduled refreshes don’t execute at the expected time
Solutions:
- Time zone: Verify your Google account time zone matches your expectation
- Authentication: Ensure your token hasn’t expired (check for notification emails)
- Trigger status: Check Edit > Current project’s triggers in Apps Script
- Quota limits: Google Apps Script has daily quotas - check if you’ve exceeded them
- Enable schedule: Make sure the schedule is active (not disabled)
401 Errors (Not Authenticated)
Good News: As of version data_v.77 + auth_v.29, 401 errors are handled automatically!
Automatic Recovery:
- The connector detects when your token expires
- Automatically refreshes OAuth tokens using the refresh token
- Retries the failed request with the fresh token
- All happens in the background - no user intervention needed!
If you still see 401 errors:
- Try logging out and logging back in manually
- Verify your OAuth refresh token is still valid
- For Basic Auth, verify credentials are correct
Frequently Asked Questions
How long do authentication tokens last?
OAuth/SSO: 90 days with automatic refresh capability Basic Auth: Tokens are refreshed as needed
Can I use the connector with personal Gmail accounts?
OAuth/SSO: Requires organizational domain (@yourcompany.com) Basic Auth: Works with any Anaplan account, including personal domains
Is my data secure?
Yes! All data remains within Google’s infrastructure. Authentication tokens are stored in Google’s secure UserProperties service, isolated per user. The connector never sends your data to external servers. See the Technical Details section for more information.
How many sheets can I refresh at once?
There’s no hard limit, but performance is optimal with 10-20 sheets per refresh. The intelligent batching system will group sheets efficiently regardless of quantity.
Can I refresh data from multiple Anaplan models?
Yes! The multi-model support feature (v.76+) allows you to configure different sheets to pull from different Anaplan models. See Section 7 for details.
What happens if my token expires during a refresh?
The connector automatically detects expired tokens, refreshes them, and retries the request. You won’t need to manually re-authenticate unless the refresh fails (rare).
Can I schedule refreshes to run when I’m not online?
Yes! Schedules run on Google’s servers using time-based triggers. You don’t need to be online or have the spreadsheet open.
Contact & Support
Need Help?
Email Support: support@anaplansheetsconnector.com Report Issues: GitHub Issues Documentation: Full Documentation Response Time: Typically within 1 business day
10. Technical Details (Appendix)
OAuth Scopes Explained
The Anaplan Connector requests the following Google OAuth scopes:
Required Scopes & Why:
https://www.googleapis.com/auth/spreadsheets
Purpose: Read and write data to Google Sheets
Used for: Updating sheet data, reading configurations, storing preferences
https://www.googleapis.com/auth/script.external_request
Purpose: Make external requests to Anaplan’s API
Used for: Fetching data from Anaplan, authenticating with Anaplan
https://www.googleapis.com/auth/userinfo.email
Purpose: Read user email address
Used for: User-specific auth token storage, email notifications
https://www.googleapis.com/auth/script.scriptapp
Purpose: Manage Apps Script triggers
Used for: Creating and managing scheduled refreshes
Minimal Permissions Principle: The connector only requests the minimum scopes necessary for functionality. We do NOT request access to Drive files, Gmail, Contacts, or any other Google services beyond what’s required for spreadsheet operations.
Data Storage & Privacy
Where is data stored?
DocumentProperties (Spreadsheet-level):
- Sheet configurations (export/view settings, filters)
- Workspace and model IDs
- Sheet-specific settings
- Stored within the Google Sheet file itself
UserProperties (User-specific):
- OAuth tokens and refresh tokens
- Basic Auth credentials (encrypted)
- User preferences (dark mode, etc.)
- Schedule configurations
- Isolated per Google user account
ScriptCache (Temporary, 10-minute TTL):
- OAuth session state during login flow
- Automatically expires after 10 minutes
UserCache (Temporary, 5-minute TTL):
- Recently-used auth tokens (performance optimization)
- Automatically expires after 5 minutes
What data is sent to external servers?
Anaplan API Only: The connector ONLY communicates with Anaplan’s official API (api.anaplan.com and auth.anaplan.com)
No third-party services: We do not send your data to any third-party analytics, tracking, or storage services
Data sent to Anaplan:
- Authentication credentials (during login)
- API requests (workspace ID, model ID, export/view ID, filters)
Data received from Anaplan:
- Authentication tokens
- List of workspaces, models, exports, and views
- CSV data from exports and views
- Metadata about views (dimensions, page selectors)
Security Best Practices
- OAuth preferred: Use OAuth/SSO for the most secure authentication
- Token isolation: Tokens are user-specific and never shared across users
- Automatic expiry: Temporary caches expire automatically
- No external storage: All data stays within Google and Anaplan infrastructure
- Logout clears auth: Logging out removes all authentication data
- HTTPS only: All API communication uses encrypted HTTPS
Footer
Anaplan Connector for Google Sheets™
© 2025 - anaplansheetsconnector.com
Google Sheets is a trademark of Google LLC. Anaplan is a trademark of Anaplan, Inc. This connector is an independent tool and is not officially endorsed by Google or Anaplan.